


How to Fit Window Shades
Roller & Roman
Made to Measure
Fitting window shades might seem like a difficult task, but it really doesn't have to be. We will take you through the process step-by-step, so you can professionally install roller and roman shades.
What you'll need...
- Screws
- Rawl plugs
- Brackets
- Screwdriver
- Drill
- Tape measure
- Pencil
Cassette or classic headrail
There are two different types of headrail that you can get from Graham & Brown. The cassette headrail hides the roll of fabric at the top of the shades, whereas the classic headrail does not. Depending on which headrail you have, you might have to take slightly different final steps - both have been explained at the end of this guide.
Step 1: face fix or top fix brackets?
When you install your brackets, you'll be able to decide whether you want to 'face fix' or 'top fix' them.
Top fixing is when you insert the screw upwards through the bracket and into a surface above - you will need to do this if you are fitting your shades inside the mount (recess). Face fixing is when you insert the screw through the side of the bracket, into a flat, horizontal surface (such as your wall). This is for shades that are being fitted outside the mount. You could also use this method to fix the brackets to the window.
- Roller Classic face fix - 6.4cm
- Roller Classic top fix – 4.6cm
- Roller Cassette – 8.0cm
- Roman Classic – 4.5cm (face & top fix the same measurement)
- Roman Cassette – 8.0cm
*Top fix means it will fix into a ceiling or top of the inside mount (recess).
*Face fix means it will fix into a wall or back of the inside mount (recess).
Cassette sizes and their protrusions differ based on the size of the roller shade.
Roller Cassette:
- 8cm (Small)
- 9.5cm (Medium)
- 11cm (Large)
| Cassette Size | Width (cm) | Max Drop (cm) |
| Small | 40cm – 180cm | 40cm – 200cm |
| Medium | 180cm – 250cm | 200cm – 250cm |
| Large | 250cm – 300cm | 250cm – 400cm |
Step 2: Mark where your brackets need to be fixed
Use your pencil to make two marks, showing where each bracket will be fixed. You will want there to be one bracket at either end of the shades, about 2 inches (Approx 5cm), inside the headrail. If you are fitting your shades inside the mount (recess), make sure you don't make your marks too close to the window. This is because you need to leave enough space for the operating mechanism, and for the shades to open and close easily.
If you are fitting your shades outside the mount, make sure to centrally align with the window frame.
Step 3: Fix your brackets to the wall or lintel
To fix your brackets, you'll firstly need to check what material you are drilling into. Ensure to use the correct rawl plugs suitable for steel, plasterboard, wood, brick etc. You need to drill holes where you made your pencil marks. Insert rawl plugs into the holes and then line up your brackets. Use a screwdriver to insert the screws and firmly attach your brackets.
Step 4: Attach your shades to the brackets
Roman shades & shades with a cassette headrail
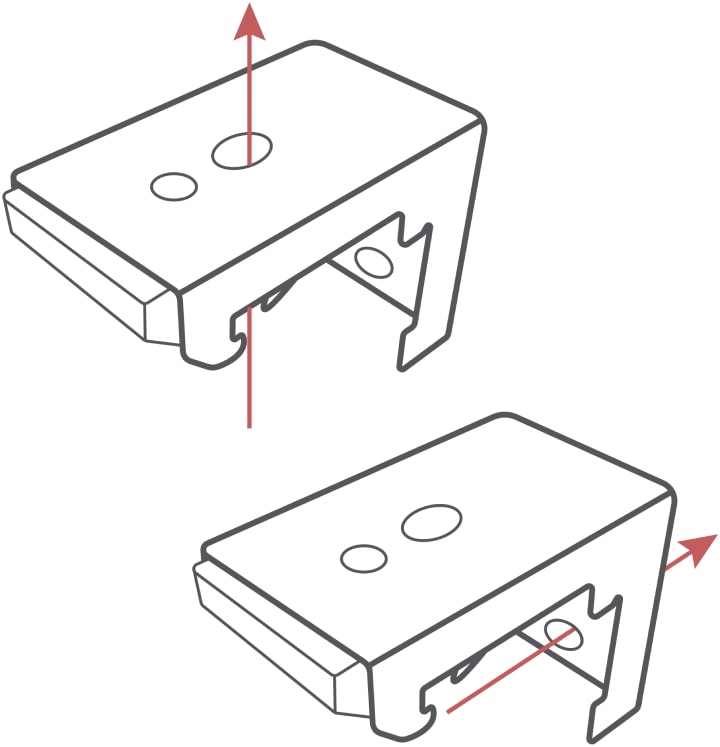
Attaching your shades once the brackets are in place is simple. Hook the headrail into the edge of the bracket, then push it forwards and tilt it down until it clicks into place.
Roller shades with a classic headrail
With these shades, you'll need to slot the headrail between the two brackets at either end. Do this by pushing one end of the headrail against the 'plunger end' bracket until it gives way and allows you to lift the other end into place.
Dressing roman shades
In a similar way to curtains, the fabric (particularly of roman shades) may be creased from transportation. The shade can be steamed to remove any creases and we recommend it is left down for 48 hours. This will allow the fabric to settle into its new surroundings.
If you're still in the early stages of buying your shades, why not take a look at our blog on how to measure for window shades? Or maybe you would rather find out how to hang curtains? Learn everything you need to know about fitting soft furnishings with Graham & Brown's how-to guides.